RAID (Redundant Array of Independent Disks) is a critical technology in data storage that enhances performance, redundancy, and reliability. Whether you’re setting up a NAS (Network Attached Storage) server for home, small business, or enterprise use, understanding the different RAID configurations and their applications is essential. This article will provide an in-depth look at various RAID levels, the minimum number of drives required for each, how they are applied in NAS servers, and which NAS models support special RAID types.
Table of Contents
What is RAID?
RAID is a data storage technology that combines multiple physical hard drives into a single logical unit for improved performance, redundancy, or both. Different RAID levels offer various combinations of speed, fault tolerance, and storage efficiency. RAID can be implemented via hardware (dedicated RAID controller) or software (through the operating system or NAS firmware).
Common RAID Configurations
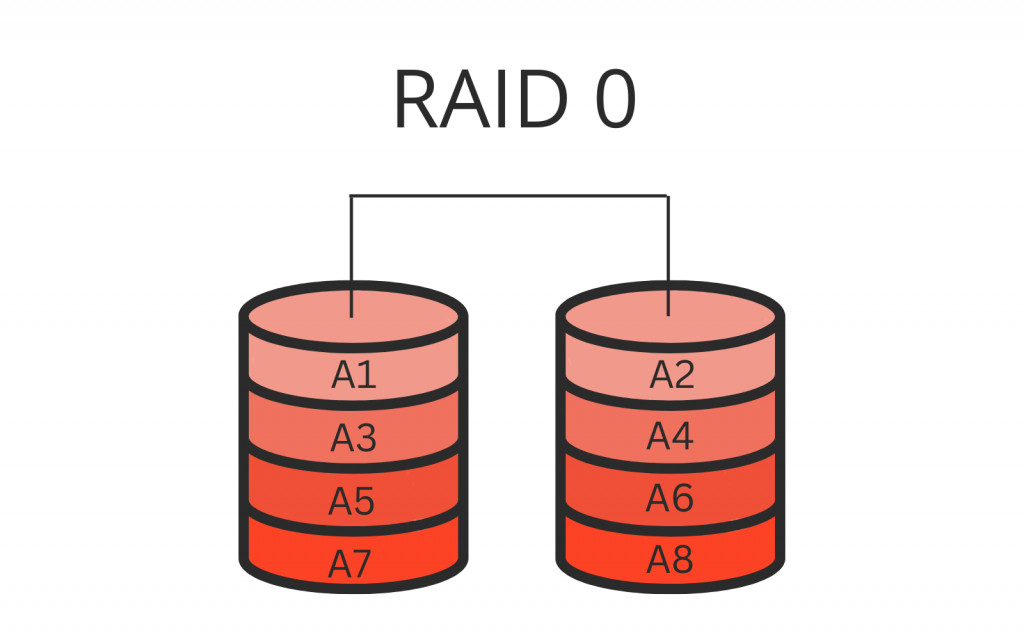
RAID 0 (Striping)
- Overview: RAID 0 distributes data across multiple drives by splitting (striping) it into blocks. Each block is written to a different drive, which enhances read and write performance.
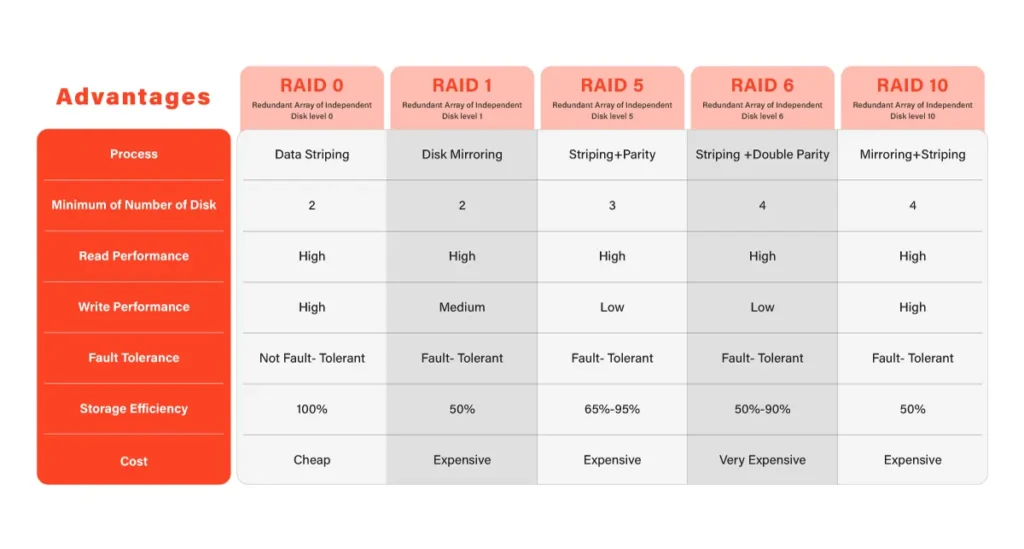
- Minimum Number of Drives: 2
- Pros: High performance since multiple drives are accessed simultaneously.
- Cons: No redundancy; if one drive fails, all data is lost.
- Use Case: Ideal for scenarios where speed is crucial, such as video editing or gaming, and data loss is not critical.
RAID 1 (Mirroring)
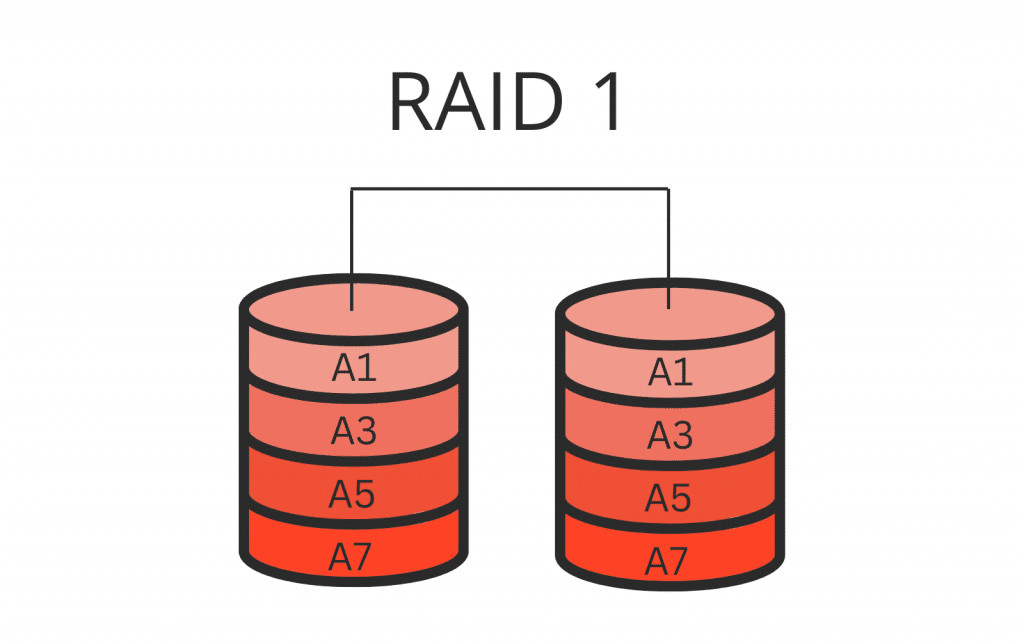
- Overview: RAID 1 creates an exact copy (mirror) of data on two or more drives. If one drive fails, the data remains intact on the other(s).
- Minimum Number of Drives: 2
- Pros: Excellent redundancy; data is safe if a single drive fails.
- Cons: Storage efficiency is low (50% if two drives are used) because half of the total storage is used for mirroring.
- Use Case: Best suited for environments where data integrity is more critical than storage capacity, such as financial data or critical business documents.
RAID 5 (Striping with Parity)
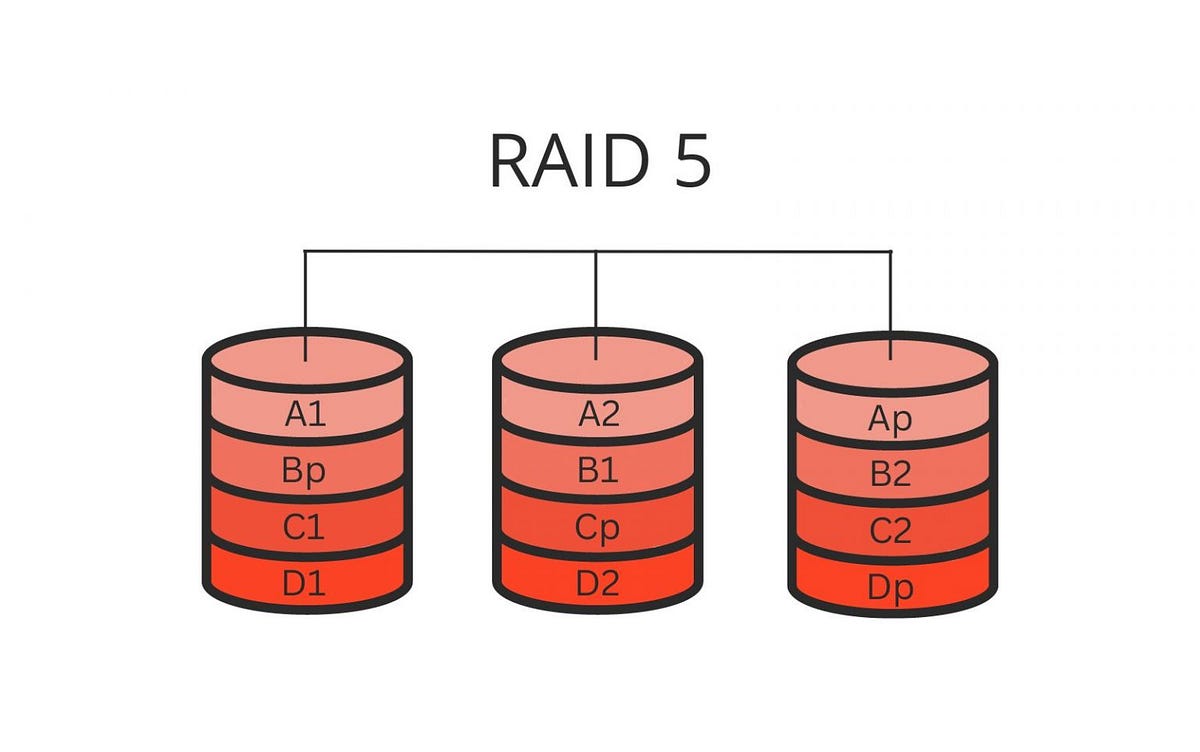
- Overview: RAID 5 stripes data across three or more drives, with parity information distributed among the drives. Parity allows data to be reconstructed in the event of a single drive failure.
- Minimum Number of Drives: 3
- Pros: Good balance between performance, storage efficiency, and redundancy. Only one drive’s worth of space is used for parity.
- Cons: Write performance can be slower due to the overhead of calculating parity. Can only tolerate a single drive failure.
- Use Case: Suitable for general-purpose file storage where a balance of performance, redundancy, and capacity is needed.
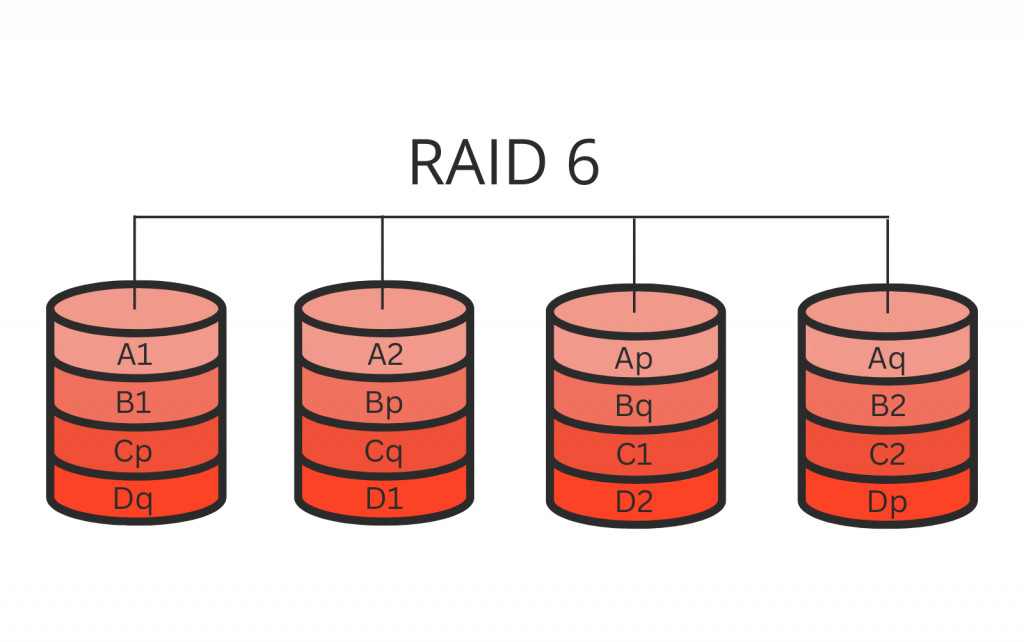
RAID 6 (Striping with Double Parity)
- Overview: RAID 6 is similar to RAID 5 but with double parity, allowing it to withstand two simultaneous drive failures.
- Minimum Number of Drives: 4
- Pros: Enhanced redundancy compared to RAID 5. Can tolerate two drive failures, making it more reliable for critical data storage.
- Cons: More overhead than RAID 5, leading to slower write performance. Requires at least four drives.
- Use Case: Ideal for larger arrays where additional redundancy is required, such as enterprise storage environments.
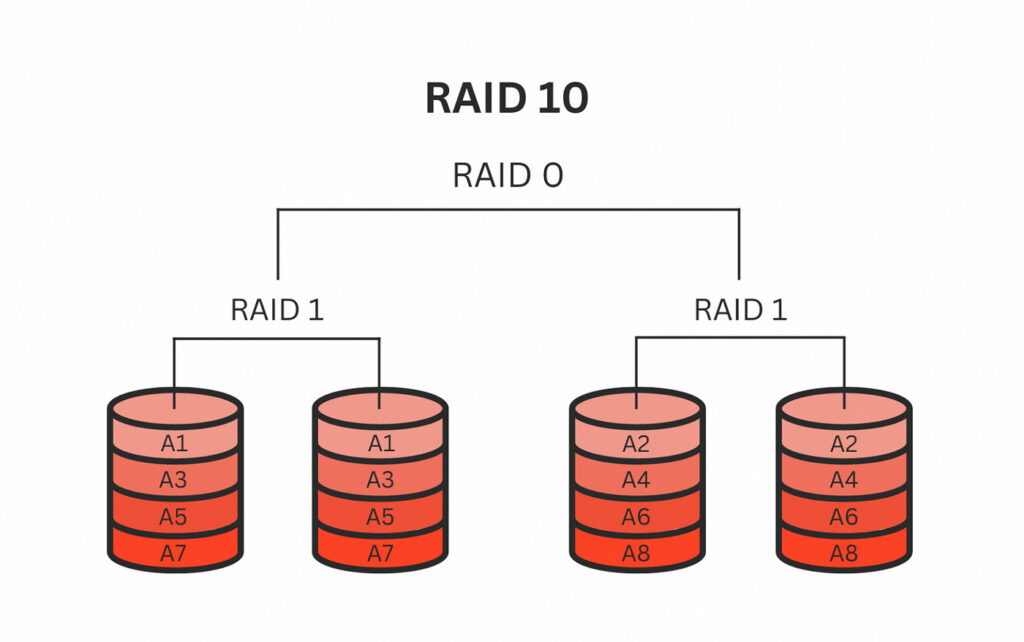
RAID 10 (1+0) (Mirroring and Striping)
- Overview: RAID 10 combines the benefits of RAID 1 and RAID 0 by mirroring and striping data across multiple drives. It requires at least four drives.
- Minimum Number of Drives: 4
- Pros: High performance (due to striping) with excellent redundancy (due to mirroring).
- Cons: Storage efficiency is 50% because of mirroring. More expensive since it requires twice the number of drives.
- Use Case: Perfect for high-performance applications that also require redundancy, such as database servers or high-availability systems.
Applying RAID in NAS Servers
When configuring a NAS server, RAID is typically set up during the initial setup process. NAS devices, such as those from Synology, QNAP, or Western Digital, come with built-in RAID management tools that allow you to choose and configure the RAID level that best suits your needs. Below are the general steps to apply RAID in a NAS server:
Step 1: Choose Your NAS and Drives
- NAS Selection: Choose a NAS model that supports the RAID level you need. Most modern NAS devices support RAID 0, 1, 5, 6, and 10.
- Drive Selection: Select hard drives that are identical in size and speed to ensure optimal performance and compatibility.
Step 2: Initial NAS Setup
- Install Drives: Physically install the hard drives into the NAS. Ensure they are securely connected.
- Power On: Turn on the NAS and connect it to your network.
Step 3: Configure RAID
- Access NAS Management Interface: Use the NAS’s web-based interface to access the RAID configuration settings. This is typically done through a browser by entering the NAS’s IP address.
- Choose RAID Level: Select the RAID level that best meets your needs based on the drive configuration and your performance and redundancy requirements.
- Initialize RAID: The NAS will initialize the RAID array, which may involve formatting the drives and synchronizing them. This process can take some time depending on the number and size of drives.
Step 4: Manage and Monitor
- Data Storage: Once the RAID array is configured, you can start using the NAS for storing data. The NAS will handle the RAID management in the background.
- Monitor RAID Health: Regularly check the health of your RAID array through the NAS interface. Many NAS devices offer alerts and notifications if a drive fails or the array encounters an issue.
NAS Servers with Special RAID Support
Some NAS servers go beyond the standard RAID configurations and offer advanced or proprietary RAID systems designed to maximize storage efficiency, performance, or data protection.
Synology Hybrid RAID (SHR)
- Overview: Synology Hybrid RAID (SHR) is a proprietary RAID management system designed to simplify RAID setup and maximize storage efficiency. SHR allows you to use drives of different sizes in the same array, which is not possible with traditional RAID.
- Minimum Number of Drives: 2 (for SHR-1), 3 (for SHR-2)
- Advantages: Easy to set up, even for beginners. Maximizes the use of available storage space, especially when using drives of varying capacities.
- Supported Models: Most Synology NAS devices, including the popular DS220+, DS920+, and DS1621+.
QNAP RAID Triple Parity (RAID TP)
- Overview: QNAP’s RAID Triple Parity (RAID TP) is an advanced RAID configuration that can protect against three simultaneous drive failures. This is particularly useful in large-scale storage environments where the risk of multiple drive failures is higher.
- Minimum Number of Drives: 5
- Advantages: Provides higher data protection than RAID 6, suitable for critical applications requiring the highest level of redundancy.
- Supported Models: High-end QNAP NAS models such as the TS-hx86 series and ES1640dc.
RAID-Z (ZFS)
- Overview: RAID-Z is a feature of the ZFS file system, commonly used in FreeNAS (now TrueNAS). RAID-Z offers features similar to RAID 5 and RAID 6 but with better data integrity and simplified administration.
- Minimum Number of Drives: 3 (for RAID-Z1), 4 (for RAID-Z2), 5 (for RAID-Z3)
- Advantages: No write hole issue, integrated checksumming for data integrity, and efficient storage.
- Supported Systems: TrueNAS and FreeNAS systems, often used in custom-built NAS solutions.
Conclusion
Understanding the different RAID levels and their applications is crucial for selecting the right RAID configuration for your NAS server. Whether you’re looking for high performance, redundancy, or a balance of both, there is a RAID level that meets your needs.
In the world of NAS servers, some manufacturers offer special RAID configurations that go beyond traditional RAID levels, providing additional flexibility and data protection. Synology’s SHR, QNAP’s RAID TP, and ZFS’s RAID-Z are excellent examples of how modern NAS solutions can cater to specific requirements, whether for home use or enterprise-level storage.
By choosing the right RAID configuration and NAS server, you can ensure that your data is stored securely, accessed quickly, and managed efficiently.

